- 日本語 <Japanese>
- 英語 <English>
Luce ASSIST 操作マニュアル
FILCO® キーボードをご購入いただき、誠にありがとうございます。
FILCOキーボードは直感的かつ、効率的に使用できることを理想とし設計されています。
FILCO Majestouch Luce[ルーチェ] シリーズは、容易にスイッチを交換する事が可能なHot-Swap機能と、RGBライティングに対応した60%サイズのコンパクトキーボードです。また専用ソフトウェア「Luce ASSIST[ルーチェアシスト]」を導入するとソフトウェアプログラミングマクロを使用できます。
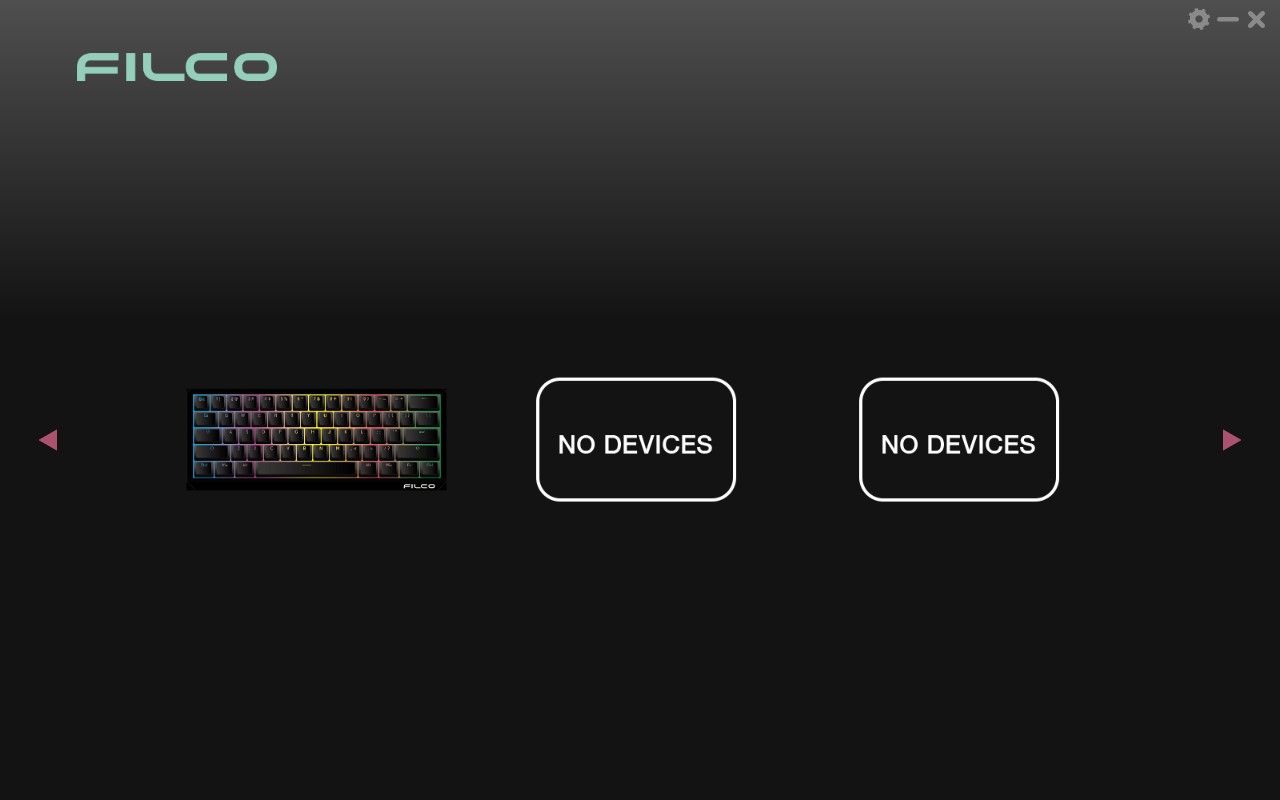
「Luce ASSIST」のホーム画面では接続されているLuceが表示され、選択するとキーの設定状態を一目で確認する事ができます。またマクロをモニターで確認しながら作成し、全てのキーに割り当てる事が可能です。更に最大10個のオリジナルプロファイルが作成できます。
もちろんプロファイルはエクスポートとインポートにも対応しているので10個以上のプロファイルが必要な場合はLuce ASSIST上でいつでも変更が可能です。
FILCO Majestouch Luceシリーズと「Luce ASSIST」を組み合わせて、煌びやかで便利なPCライフをお楽しみください。
目次
1.準備
1-1.ソフトウェアのインストール
ソフトウェア使用許諾条件をよくお読みになり、同意いただいた場合のみソフトウェアをインストールしてください。
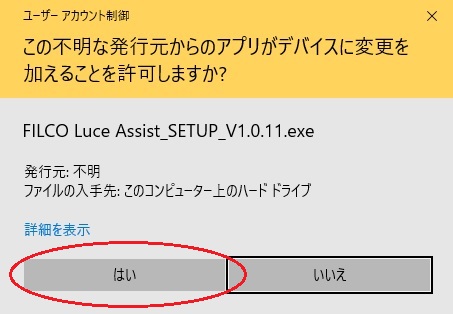
インストーラーファイル (FILCO Luce Assist_SETUP_V1.0.11.exe) を実行時、Windowsのセキュリティにより下記が表示される場合の手順
1. 左の「詳細情報」をクリック。
2. 「実行」ボタンをクリック。
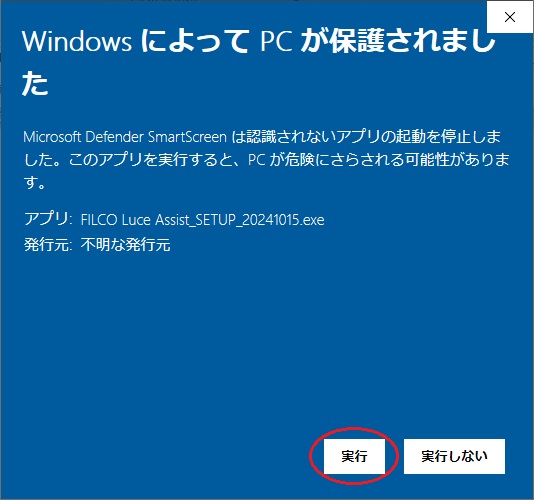
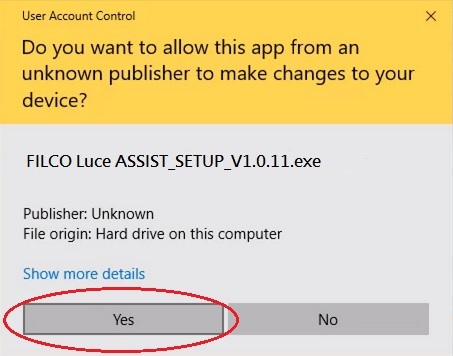
3. ボックスが表示されたら「はい」をクリック。
4. インストーラーが起動しますので「Install」ボタンをクリックするとインストールが開始されます。

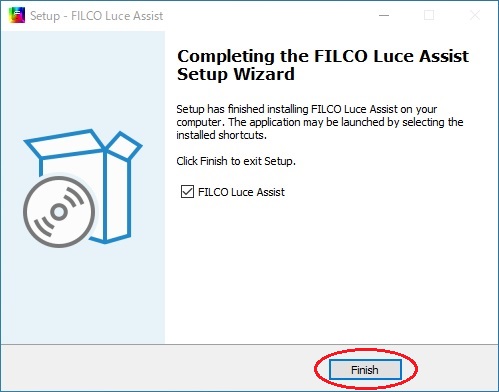
5. インストールが終了したら「Finish」ボタンをクリックして完了。

1-2.ソフトウェアを設定する
Luce ASSISTを起動します。
ホーム画面右上の「設定( )」から各種確認、設定を行えます。

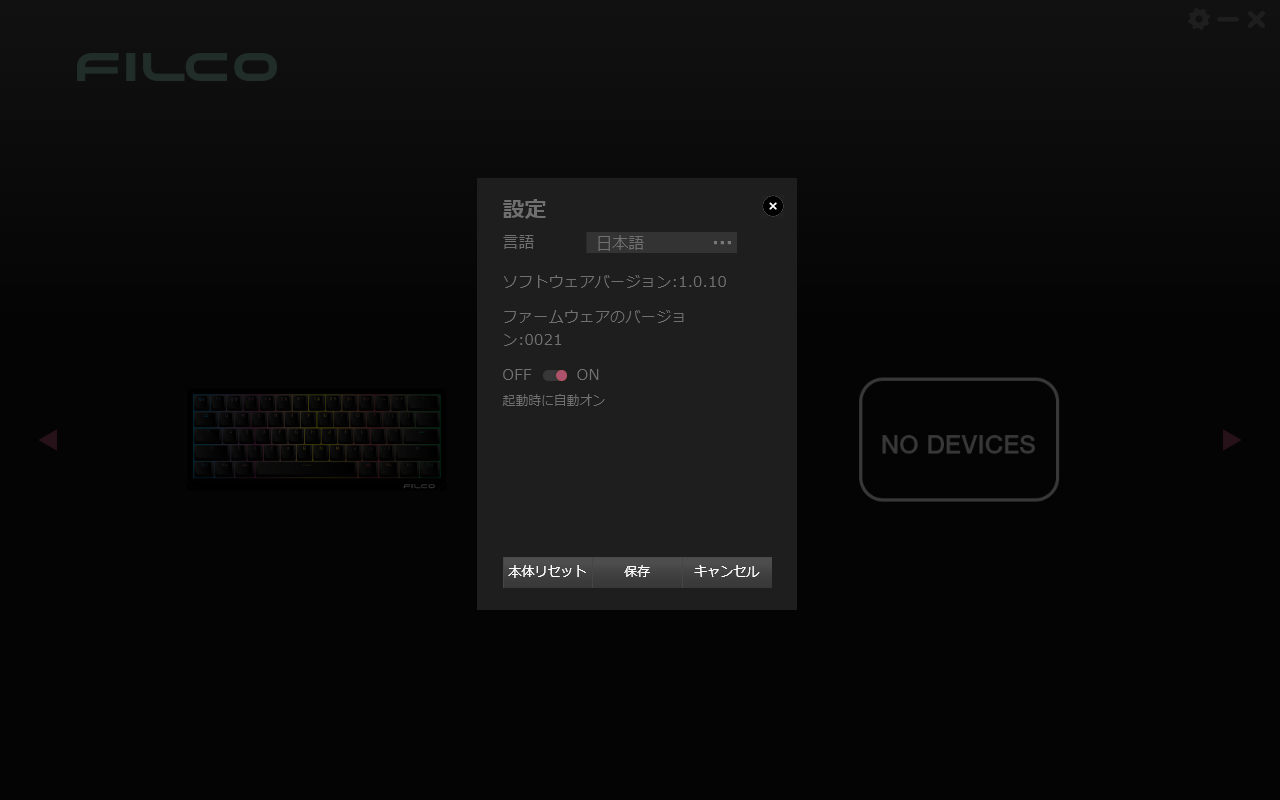
・言語の選択 (日本語・英語・簡体字・繁体字)
・ソフトウェアのバージョン情報
・キーボードファームウェアのバージョン情報
・PC起動後の自動起動 (ON/OFF)
・ソフトウェアの自動起動 (ON/OFF)
・初期化 (キーボード上のマクロ) ※メインメニュー上ではリセットが実行されません。
・保存 (設定の保存)
・キャンセル
1-3.ソフトウェアの表示と機能
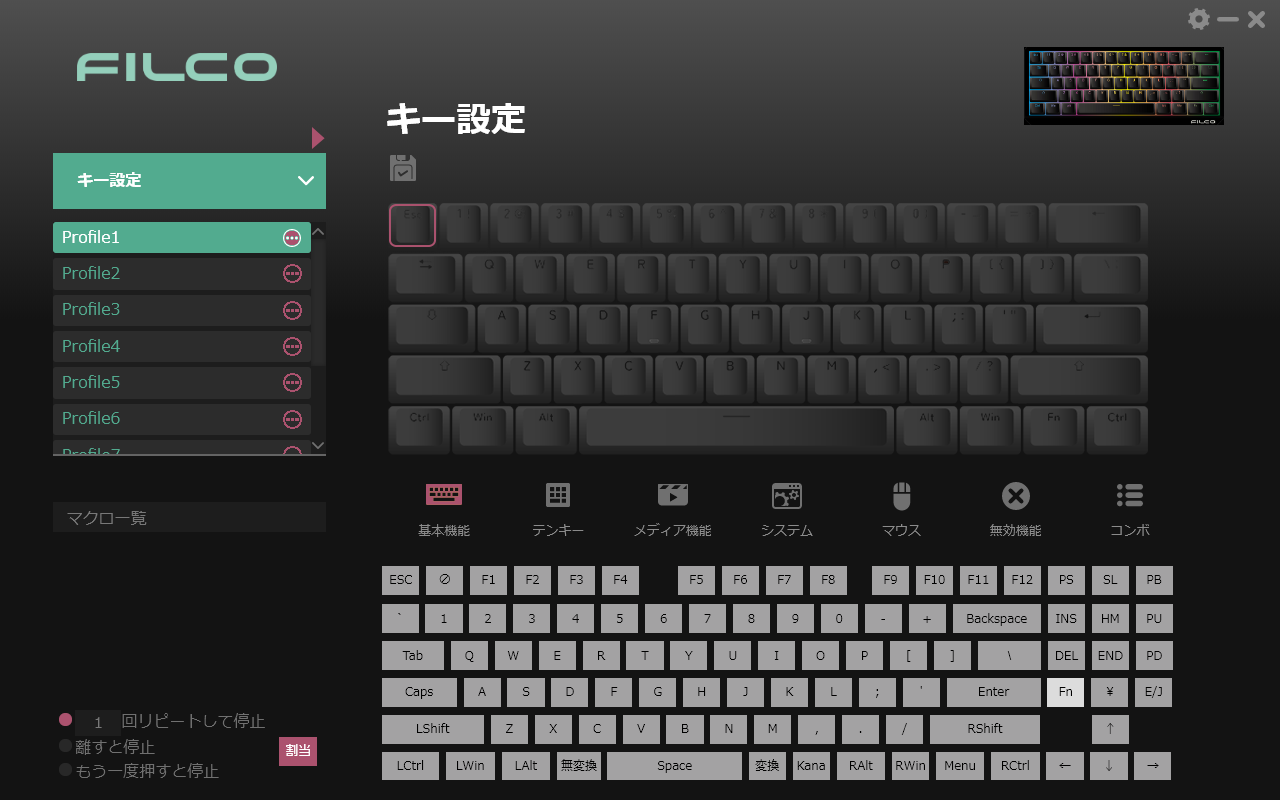
「ホーム」画面のキーボードを押すと現在のキーボードの状態を確認できます。またキーマップの変更や簡単なショートカットの割り当てもここで行います。
メニュー:
プルダウンからキーの割り当て変更やライティング、レコードマクロを選択できます。
またプルダウン右上の「 」を選択するとプロファイルのエクスポートとインポートが可能です。
※各メニューの詳細は2.以降にて記載
プロファイル選択:
予め10個のプロファイルが用意されており、プロファイル名をダブルクリックすることで名称の変更ができます。
また名称右側のボタンからはwinキーロック機能やカーソルキー切替の設定変更が可能です。
カーソルキー切替…ONにするとI,J,K,LのカーソルキーがW,A,S,Dに切り替わります。
プロファイルレイアウト:
選択しているプロファイルのキーマップが表示されます。
マクロ倉庫:
現在選択しているマクロ倉庫内のマクロ一覧が表示されるエリアです。
プロファイルレイアウトに表示されているキーマップへマクロの割り当てができます。
キーマップメニュー:
キーマップを変更する為のキーやショートカットを選択できるエリアです。
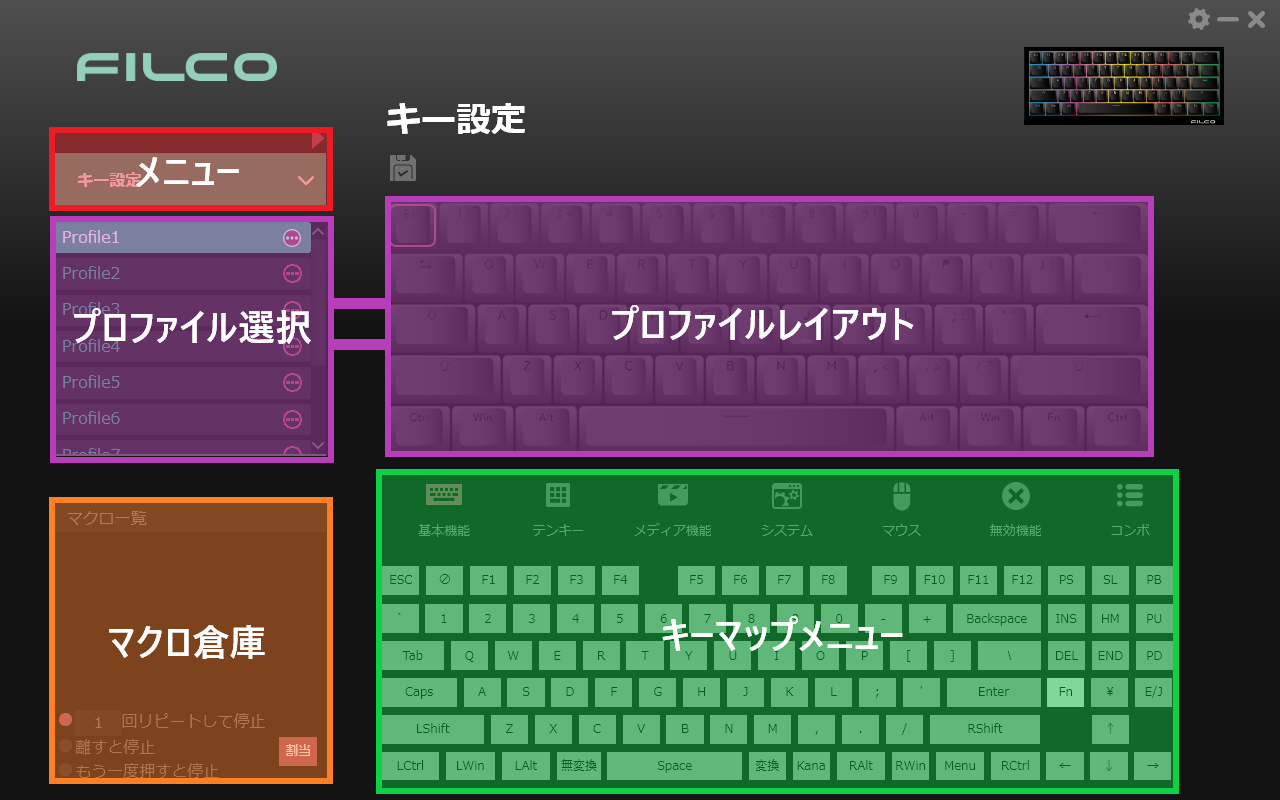
2.キー設定を使用する
2-1.各機能について
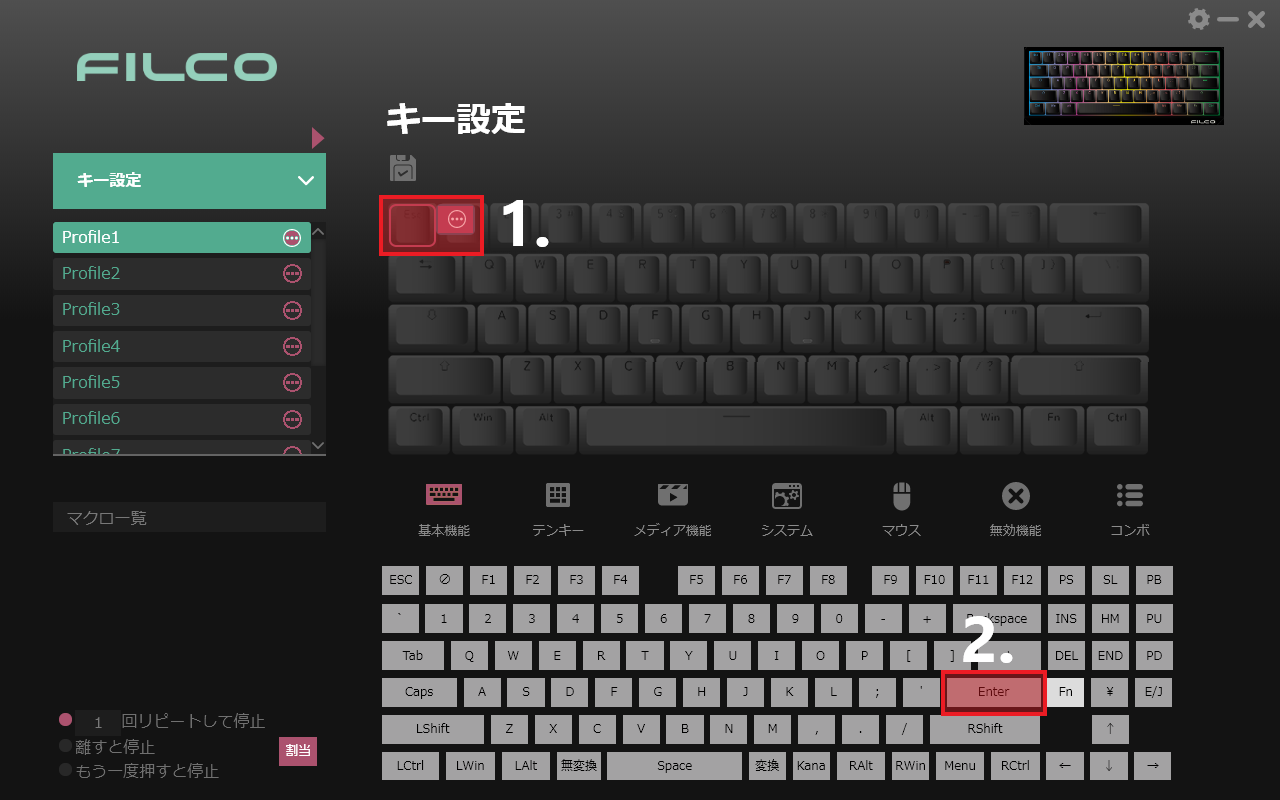
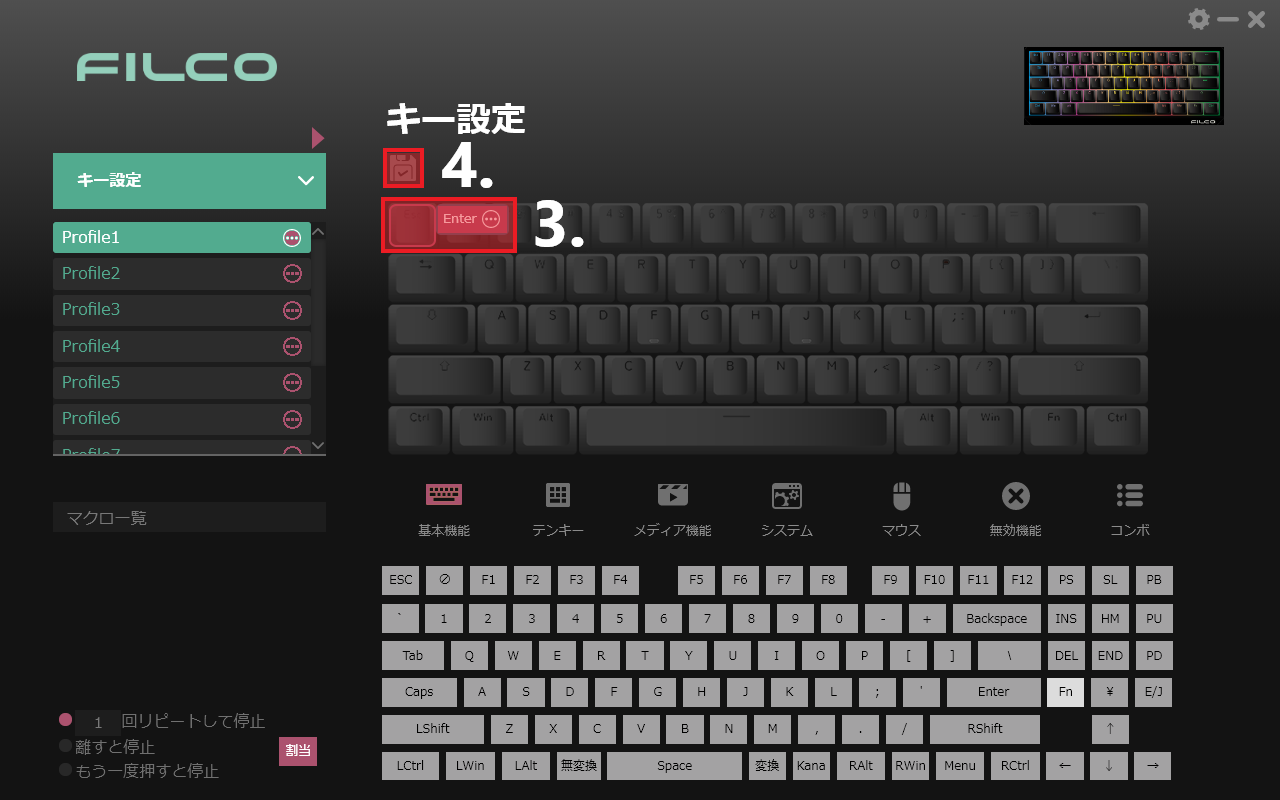
メニュー初期値のキー設定ではキーマップの変更が可能となり、任意のキーへ7つのカテゴリーから機能を割り当てることができます。 実際にEscにEnterを割り当てる場合の設定手順を下記に記載します。
【設定手順】
1.割り当てを変更したいキー「Esc」を選択します。
2.割り当てたいキー「Enter」を下部のキーマップから選択します。
3.割り当てられたことを確認します。
4.保存を押して完了です。
2-2.基本機能とその他のメニューについて

基本機能:
通常キーの割り当てができます。但し、製品本体の配列に存在しないキーを割り当てることはできません。
※英語配列に¥を割り当てる等
テンキー:
テンキーの機能が割り当てられます。
メディア機能:
動画や音楽、PC音量のショートカットが割り当てられます。
Media Playerと再生/一時停止は動画でのみ機能し、曲戻し、曲送りは音楽でのみ機能します。停止は動画音楽のどちらでも機能します。
音量上げる、音量下げる、消音はPC本体の音量調節です。
システム:
ブラウザやOS上で使用できる簡単なショートカットが割り当てられます。
お気に入りはブラウザ上のお気に入りバーの表示有無の機能です。またブラウザは規定値になっている設定に準じます。メールはOutlookを起動します。
マウス:
左右クリック等の機能を割り当てられます。
無効機能:
キーの無効や有効をキーの種類(レイアウト範囲)毎に行えます。
コンボ:
Alt/Shift/Ctrl/Winから任意のキーをONにして、組合せキーにコンボを作成したいキーを入力することでコンビネーション機能を割り当てることができます。
※無変換、変換、Kana、E/J、Fnは設定できません。
※CapsはShiftを押しながら入力してください。
3.SW・HWライティングを使用する
3-1.SW(ソフトウェア)ライティングについて
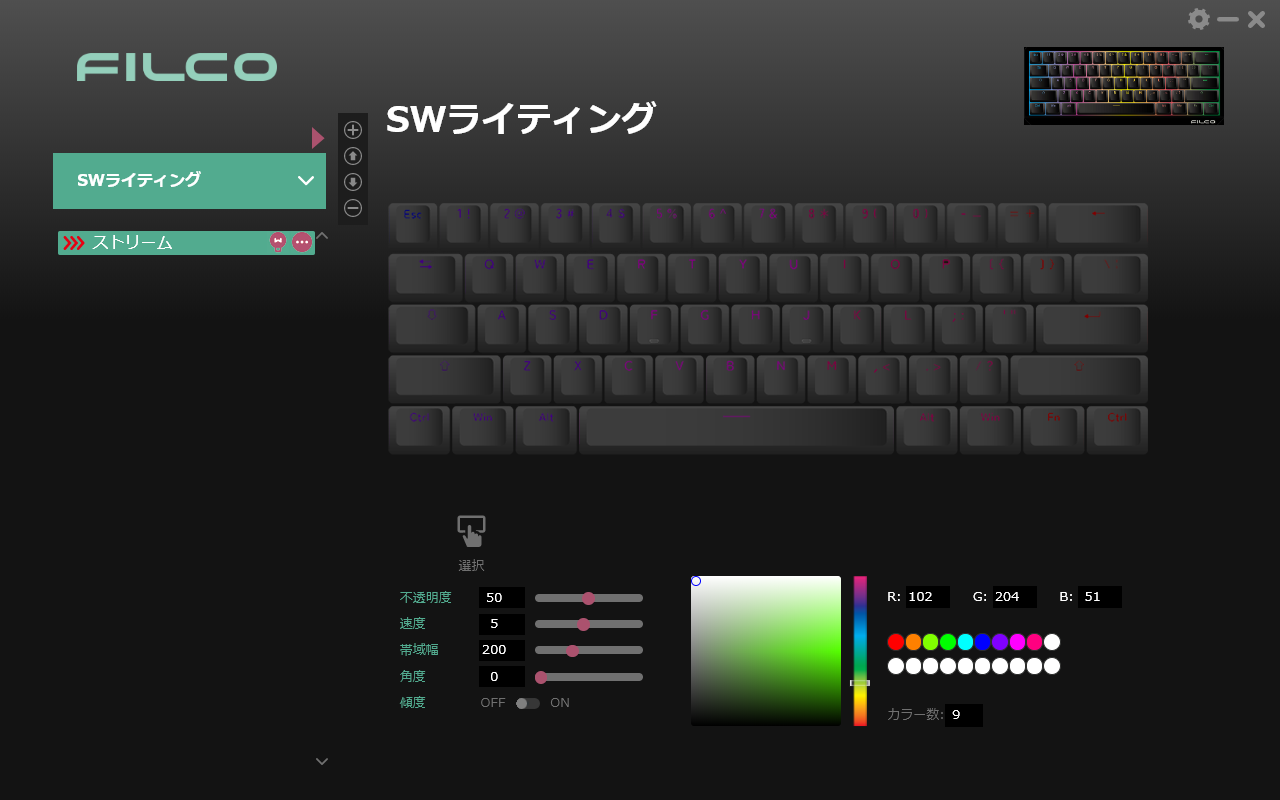
SWライティングはLuce ASSISTが起動中のみ使用できるライティング設定です。
ライティングパターンはグラデーションから入力時のみの発光、音楽に合わせて変化するパターンなど、11種類搭載されています。
またHWライティングよりも細かな調整が可能ですが、起動はアプリケーションから行い、ソフトウェアが起動している時のみライティングが反映されます。
3-2.SW(ソフトウェア)ライティングの機能
【表示内容について】
1.オプションメニュー (設定したライティングの追加や削除、エクスポートとインポート)
2.発光のON/OFFスイッチ
3.ライティングパターンの一覧を表示
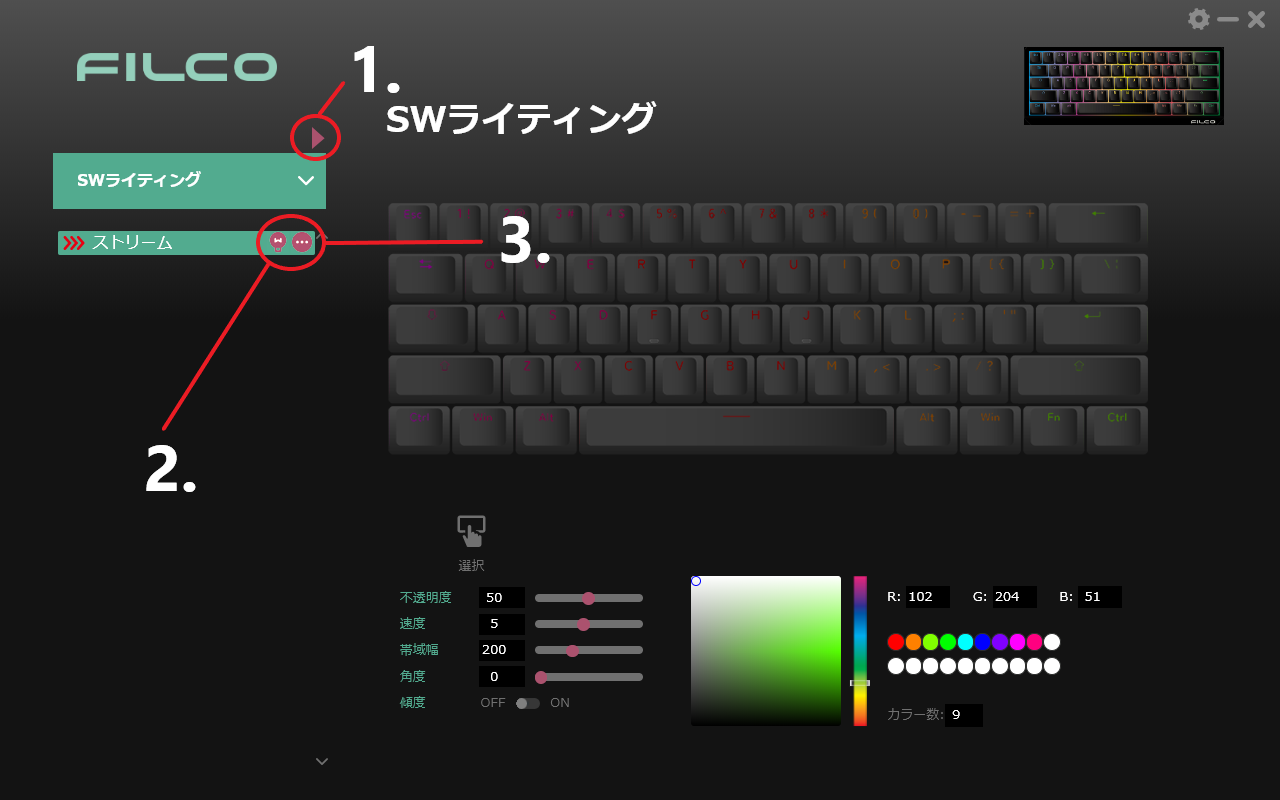
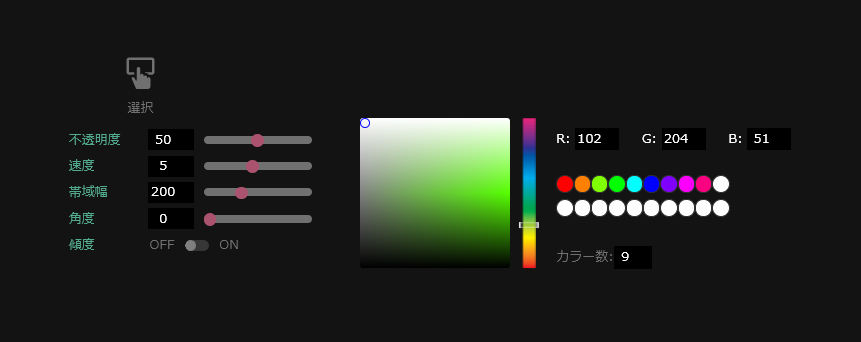
【ライティング設定について】
ライティングパターンを選択すると下部に設定メニューが表示されます。
※適応できる効果(不透明度や角度等)はライティングのパターンによって異なります。
選択:
選択したキーの照明効果を無効にする
エフェクト:
選択したキーを発光パターンの中心点にする
不透明度:
発光強弱の調整
速度:
発光パターンの速度の調整
帯域幅:
発光パターンの帯の広さを調整
角度:
発光パターンの角度を調整(色が流れる角度)
傾度:
発光する色と色の境目に中間色を差し込む(グラデーション)
ギャップ:
発光パターンを繰り返す間隔(数値を上げると間隔が開く)
双方向:
パターンを左右対称にする効果
カラー数:
発光色の追加
最大20色まで追加が可能。
※速度が極端に早くなると色やパターンが正しく反映されない場合があります。
ファイヤー:
火の大きさ(パターン:ファイヤー専用)
振幅:
音の影響による発光パターンの範囲(パターン:音響シンク限定)
3-3.HW(ハードウェア)ライティングについて
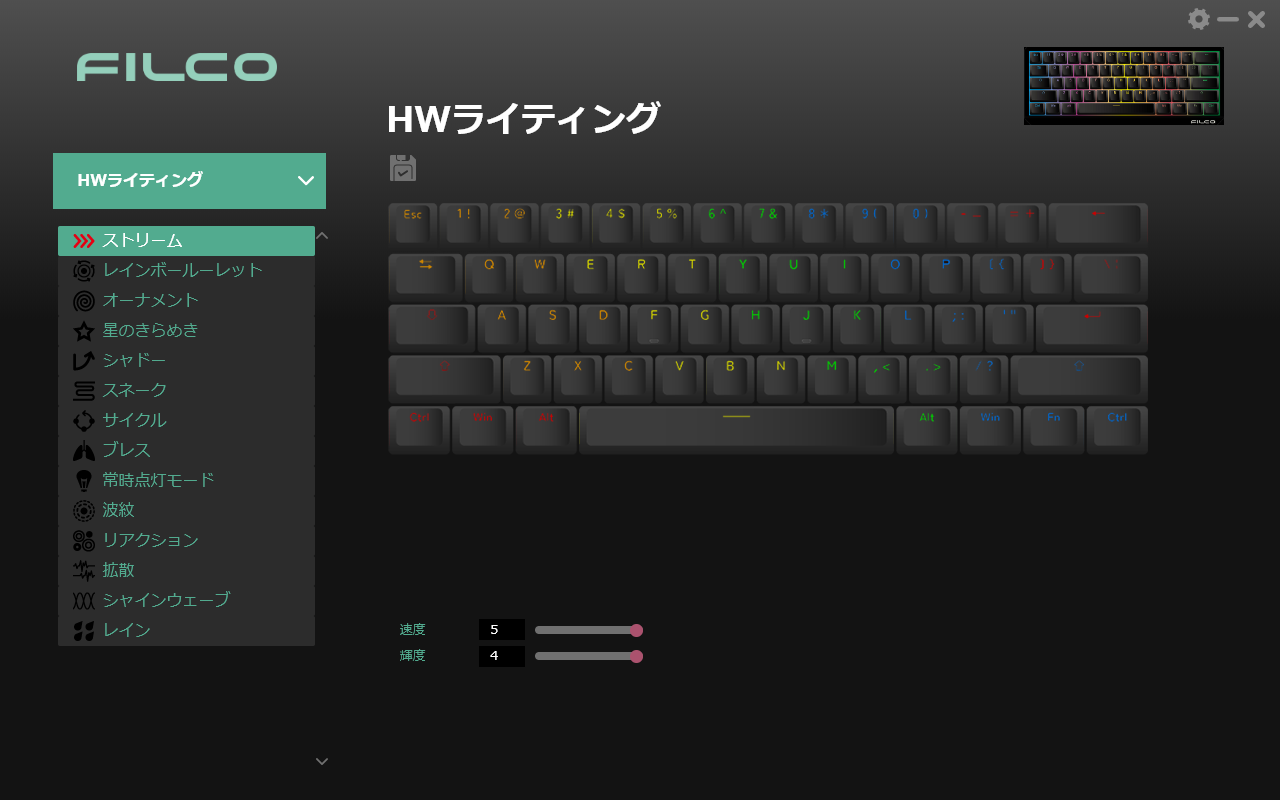
HWライティングはキーボード本体に内蔵されているライティング設定です。
ライティングパターンは14パターン搭載されており、簡易的なライティング設定が行えます。
レイアウトの上に表示されている保存アイコンを押すと現在選択しているプロファイルに設定を保存します。
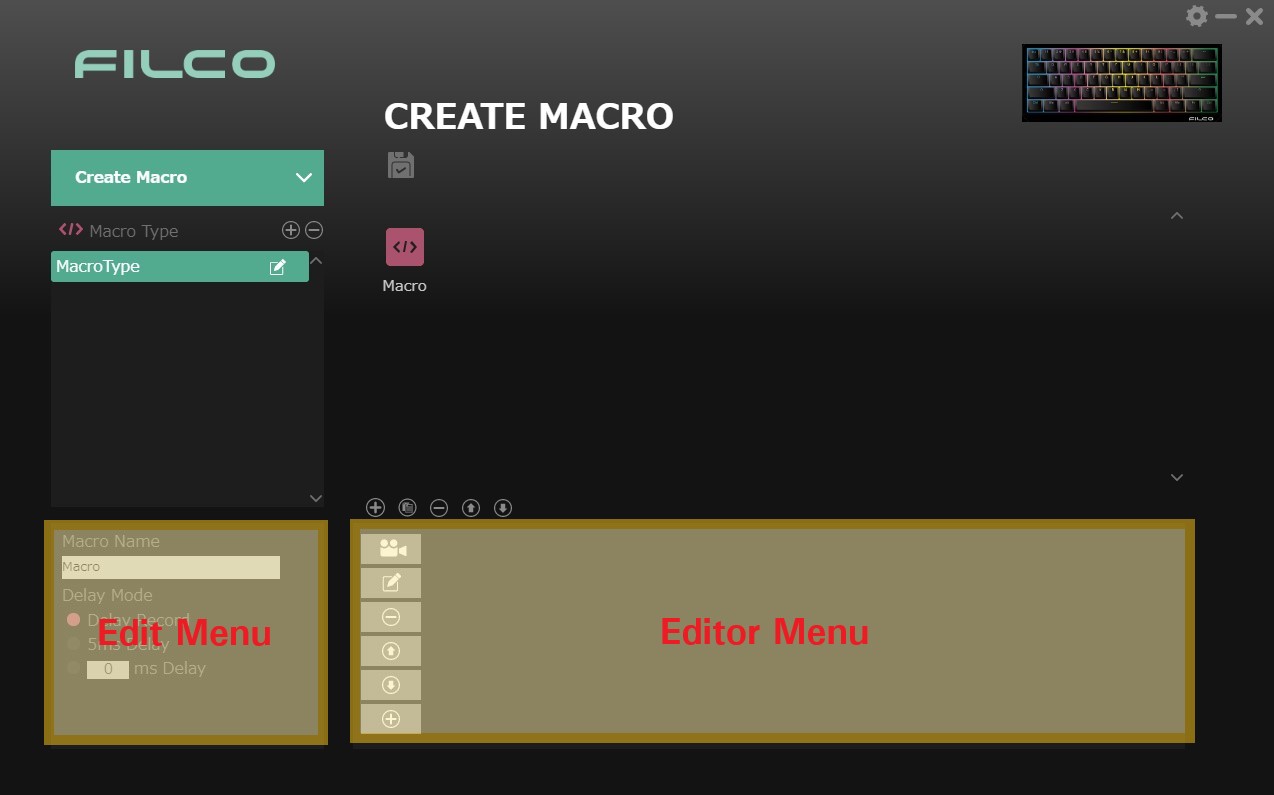
4.マクロ作成を使用する
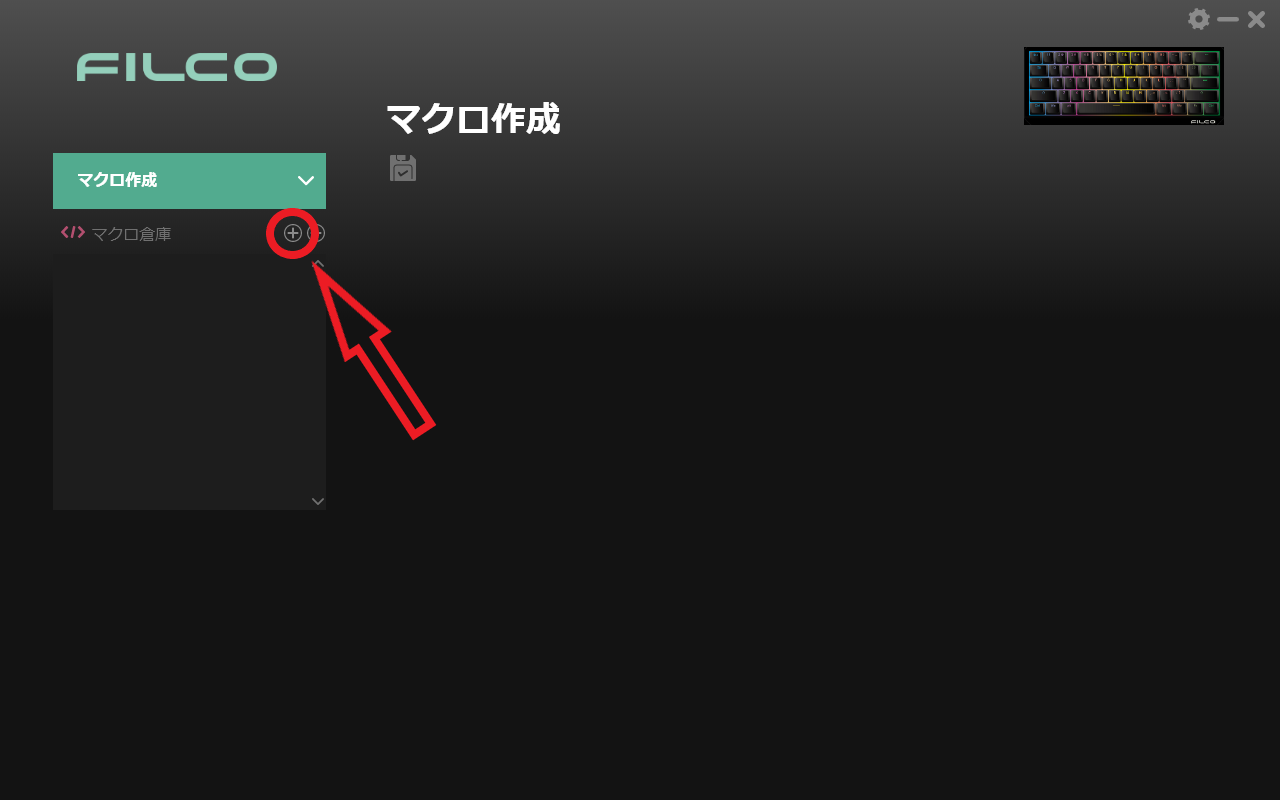
4-1.マクロ倉庫について
マクロ倉庫はマクロの保存場所です。
Luce ASSIST内ではマクロ倉庫を最大で20個まで作成可能となっており、1つの倉庫には40個のレコードマクロを保存できます。
またマクロ倉庫が20個以上必要な場合でもエクスポートとインポートにも対応しているのでソフトウェアの範囲外で管理できます。
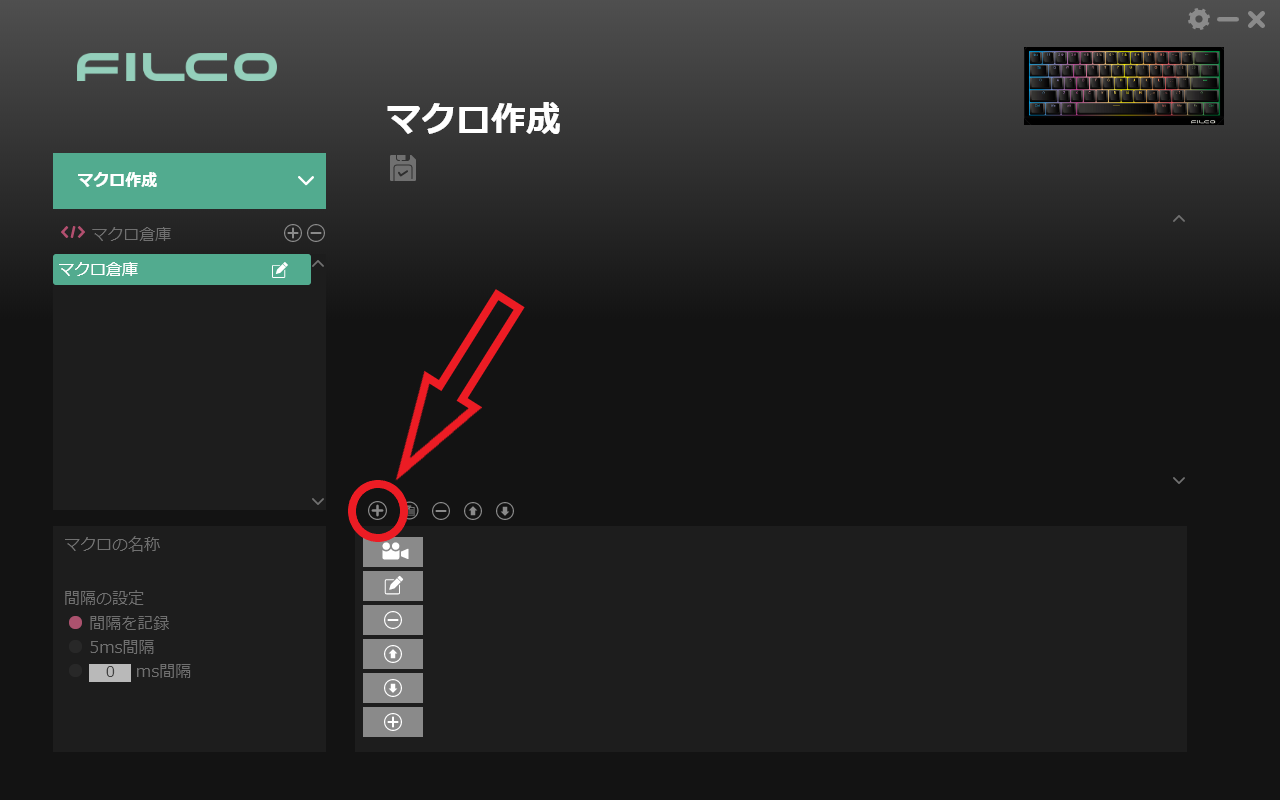
【マクロ倉庫新規作成】
マクロ倉庫の をクリックして新規作成をクリックすると倉庫の作成が完了します。( :新規作成 :削除)
※倉庫名の横にあるペンアイコン( )でマクロ倉庫名の編集ができます。
4-2.マクロファイルについて
マクロ倉庫内にはマクロファイルを追加することができます。またマクロファイルはレコードマクロとなり、ファイル名の変更や入力の間隔も調整できます。
【マクロファイル新規作成】
左下のファイルメニューより「 」でマクロファイルの新規作成を行います。
【ファイルメニューついて】
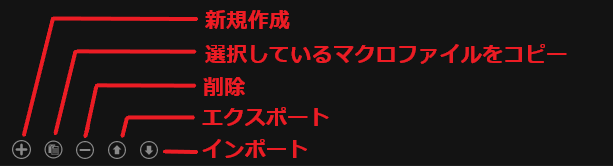
4-3.マクロファイルの設定について
マクロファイルのメニューは名称やマクロの遅延設定を行える編集メニューと各キーストロークの録画や入力間隔等の細かな調整が行えるエディタメニューがあります。
マクロはレコードマクロとなり、キーストロークの記録上限はマウスクリック含め40個まで記録可能です。
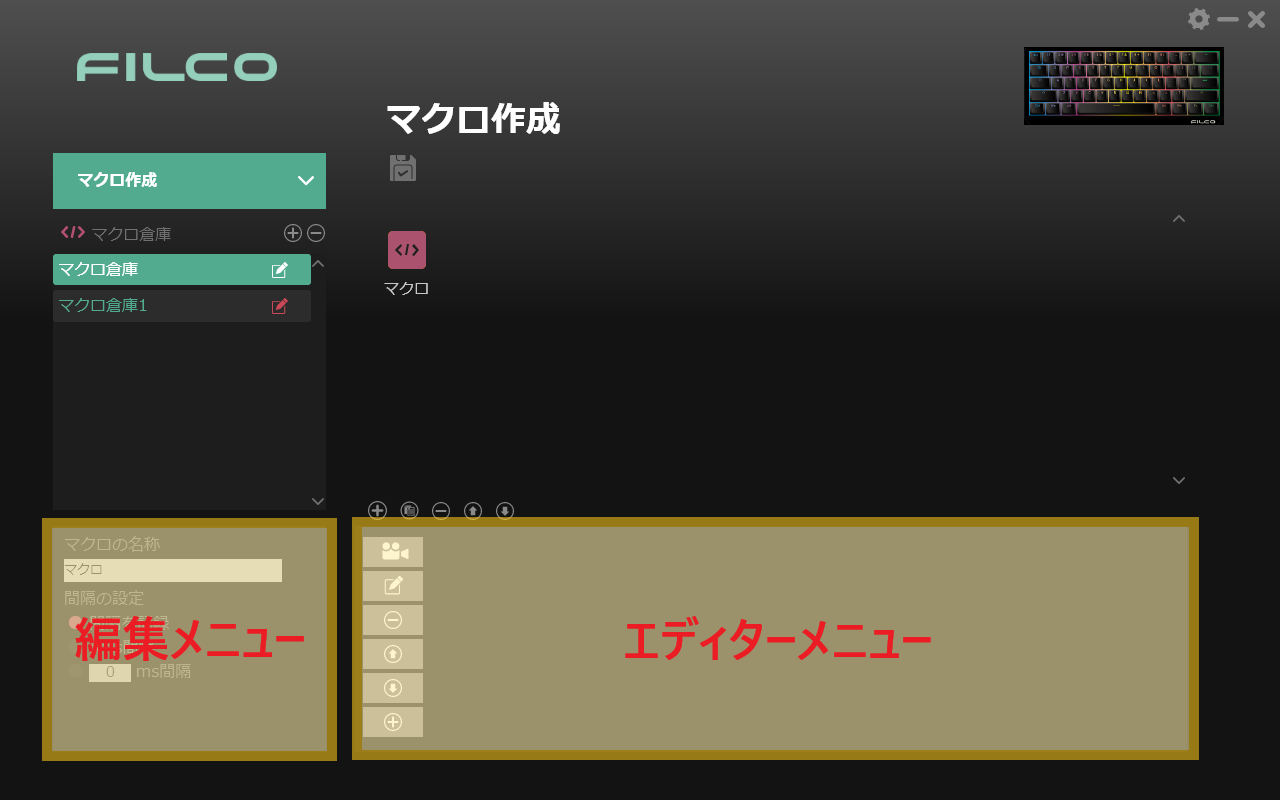
【編集メニュー】
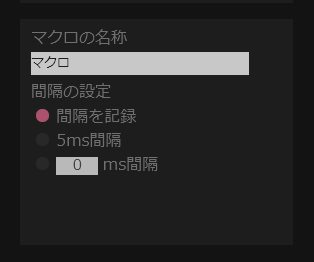
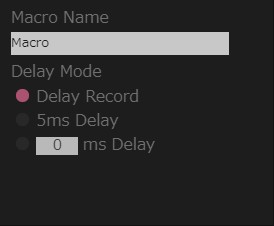
マクロファイル名称:
テキストボックスを押すとマクロファイルの名称を変更できます。
間隔を記録:
キーストロークの記録速度に基づいてマクロの内容を記録
5ms 遅延:
各ストロークを5msの速度で記録
Nms 遅延:
ユーザーが指定した時間に基づいてストロークの内容を記録
※遅延については後から手動変更が可能です。
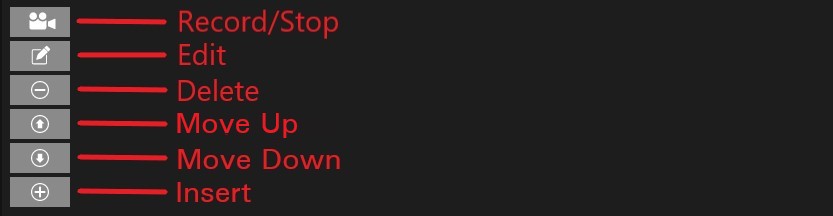
【エディターメニュー】
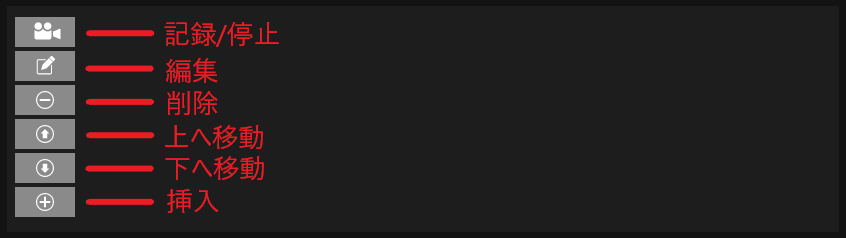
記録/停止:
押すと記録を開始し、再度押す事で記録を停止します。
編集:
選択しているストロークの間隔やキーの編集モードに移行します。もう一度押すとモードが終了します。
削除:
現在選択しているストロークの削除を行います。
上へ移動:
選択しているストロークの上へカーソルを移動します。
下へ移動:
選択しているストロークの下へカーソルを移動します。
挿入:
キーのストロークを追加します。
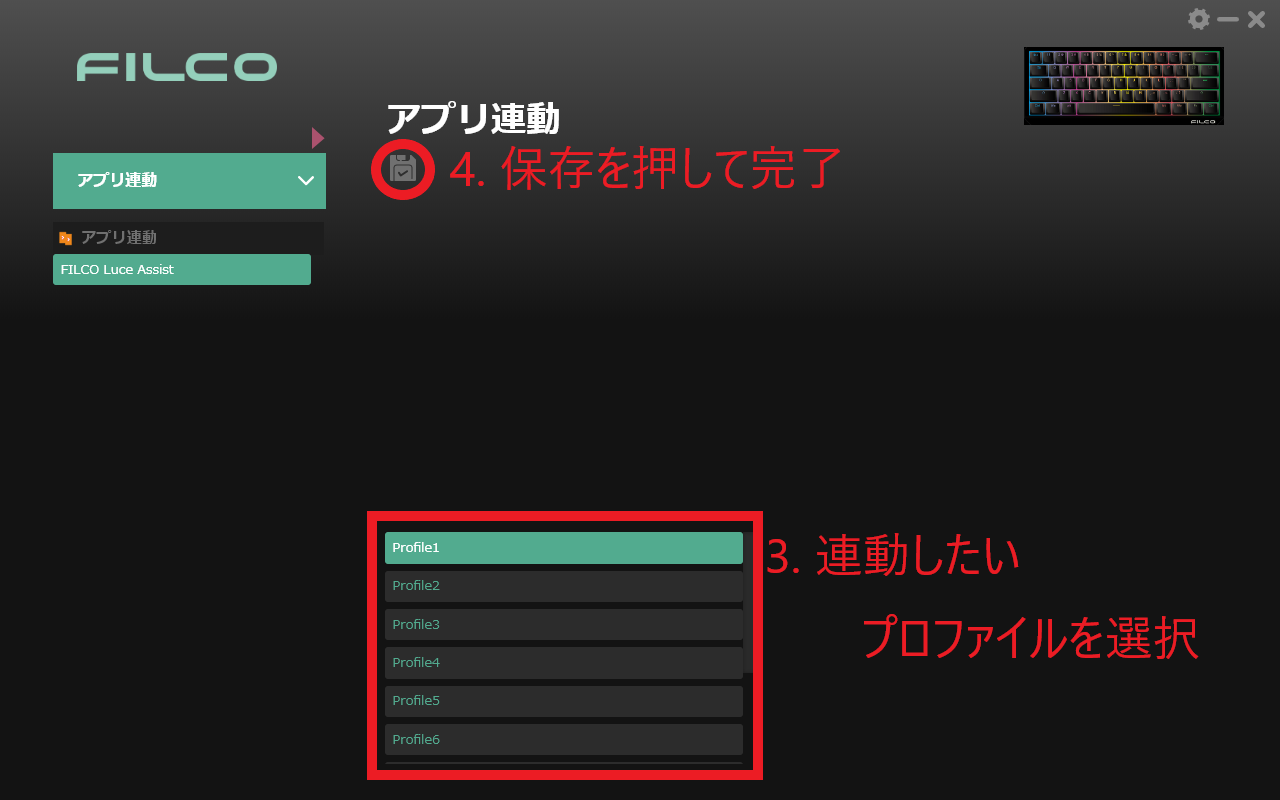
5.アプリ連動を使用する
アプリ連動は設定を行ったアプリケーションを起動すると紐づけされたプロファイルへ自動で切り替わる機能です。
連動できる拡張子は「.exe(実行ファイル) 」ですが、各アプリケーションでの動作対応については実際に設定を行ってご確認ください。
※全てのアプリケーションでの動作には対応しておりません。
【アプリ連動設定手順】
1.メニュー右の「 」をクリックし「Appを選択」を選択します。
2.開かれたメニューから任意の.exeファイルを指定します。
3.連動したいプロファイルを選択します。
4.保存を押して設定完了です。

Luce ASSIST Operation Manual
Thank you for purchasing FILCO® keyboard.
FILCO keyboards are designed to be intuitive and efficient to use.
FILCO Majestouch Luce series is a compact keyboard which is 60% size keyboard and supports RGB lighting and Hot-Swap function that allows you to easily replace switches. Also, by installing the dedicated software "Luce Assist", you will be able to use software programming macros.
Luce will be displayed on the home screen of "Luce Assist", and when selected, you can check the key setting status at a glance. You can also create macros while checking them on the monitor and assign them to all keys. In addition, 10 original profiles can be created.
Profiles can also be exported and imported, so if you need more than 10 profiles, you can change them at any time on Luce Assist.
Combine FILCO Majestouch Luce with "Luce Assist" and enjoy glittering and convenient PC life.
Table of contents
1-3. Software display and functions
2-2. About basic functions and other menu
3. Using [LIGHTING SETTING/BUILT-IN EFFECTS]
3-2. [Lighting Setting] Functions
1. Prepare
1-1. Software Install
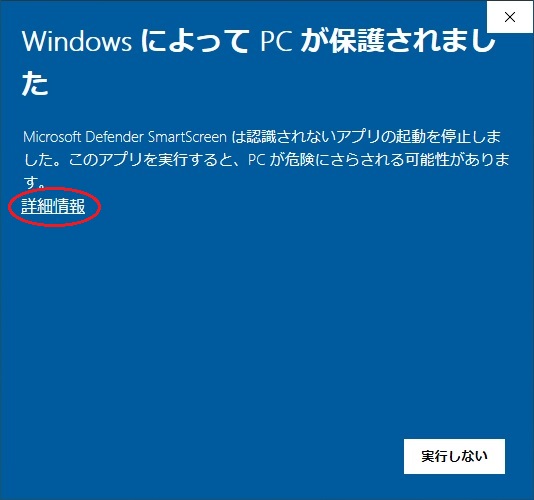
Please read the software license terms carefully and install the software on agreement.
If the following message appears when running the installer file (FILCO Luce Assist_SETUP_V1.0.11.exe) due to Windows security, please follow steps below:
1. Click "More Info" on the left.
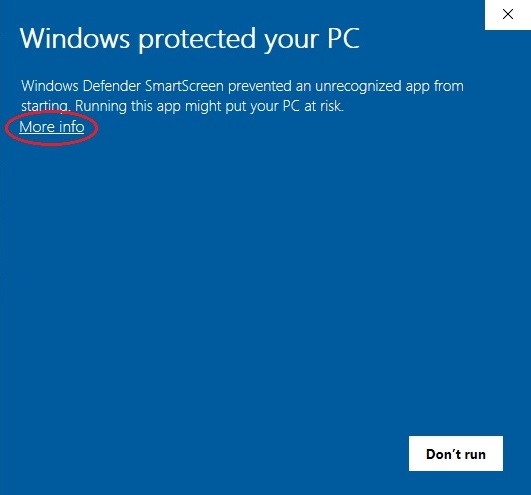
2. Click the "Run anyway" button.
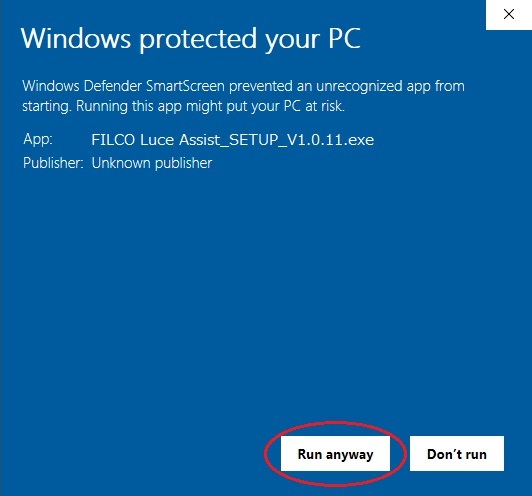
3. When the box appears, click "Yes".
4. Cick the "Install" button to begin the installation.

5. Once the installation is complete, click the "Finish" button.
1-2. Software Setting
Launch Luce Assist and open "Settings ( )" in the top right corner of the home screen.
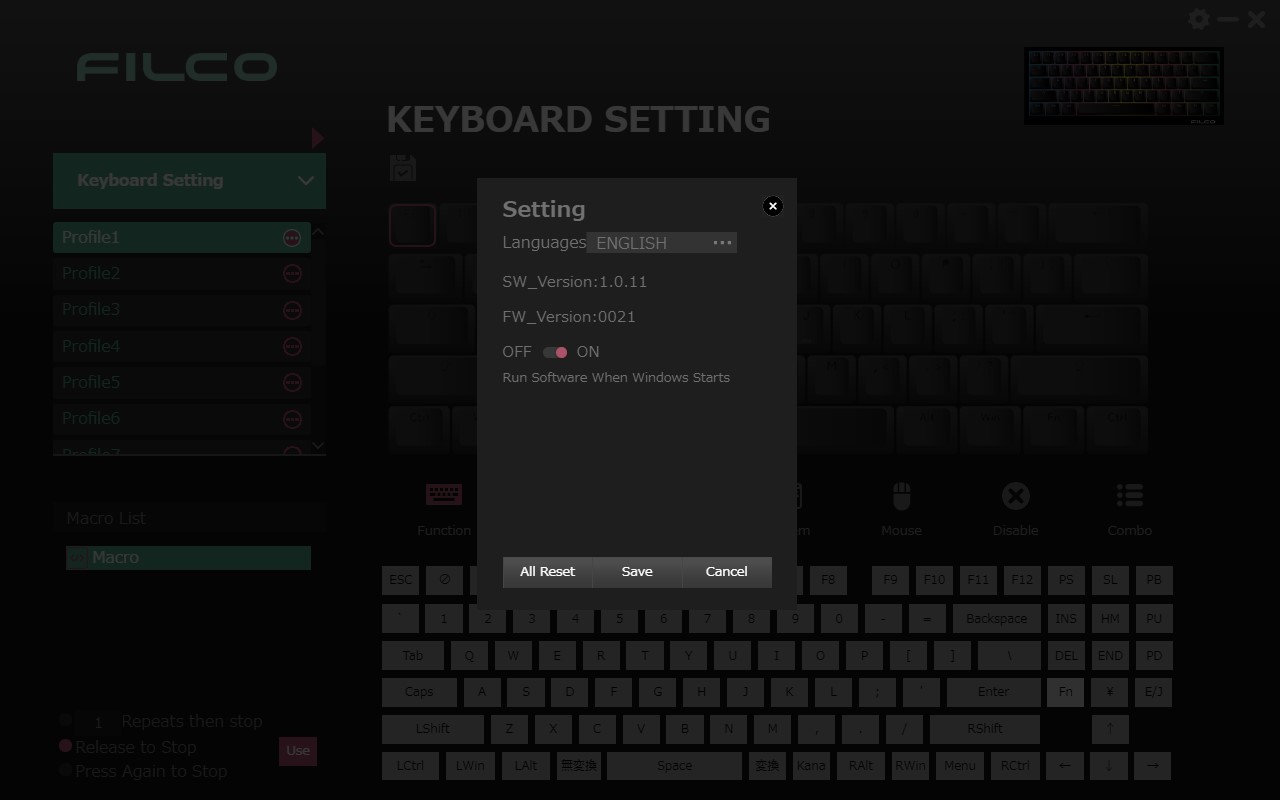
・Select language (English, Japanese, Simplified Chinese, Traditional Chinese)
・Software version information
・Keyboard firmware version information
・Run Software When Windows Starts (ON/OFF)
・All reset (macro on keyboard) *Reset is not performed on the main menu.
・Save (save settings)
・Cancel
1-3. Software display and functions
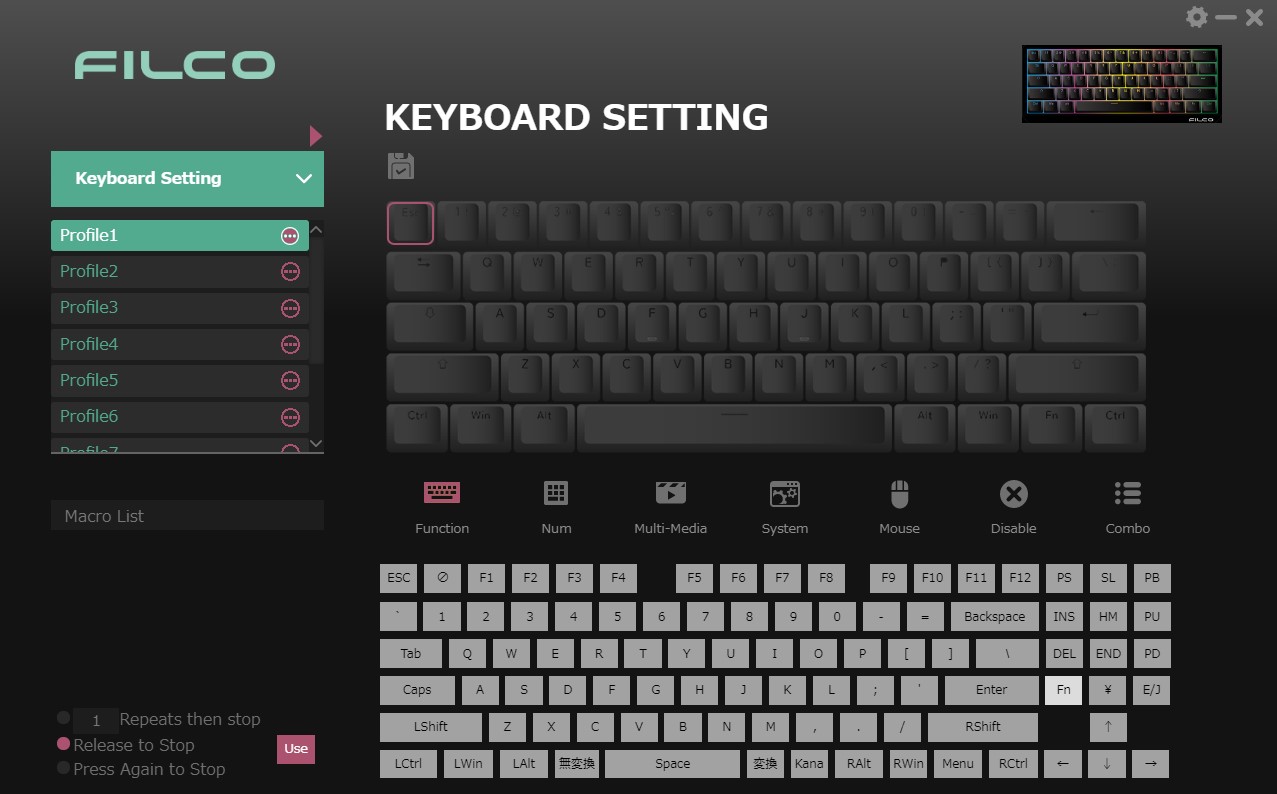
Press keyboard on the "Home" screen to check the current keyboard status. You can also change the keymap and assign simple shortcuts.
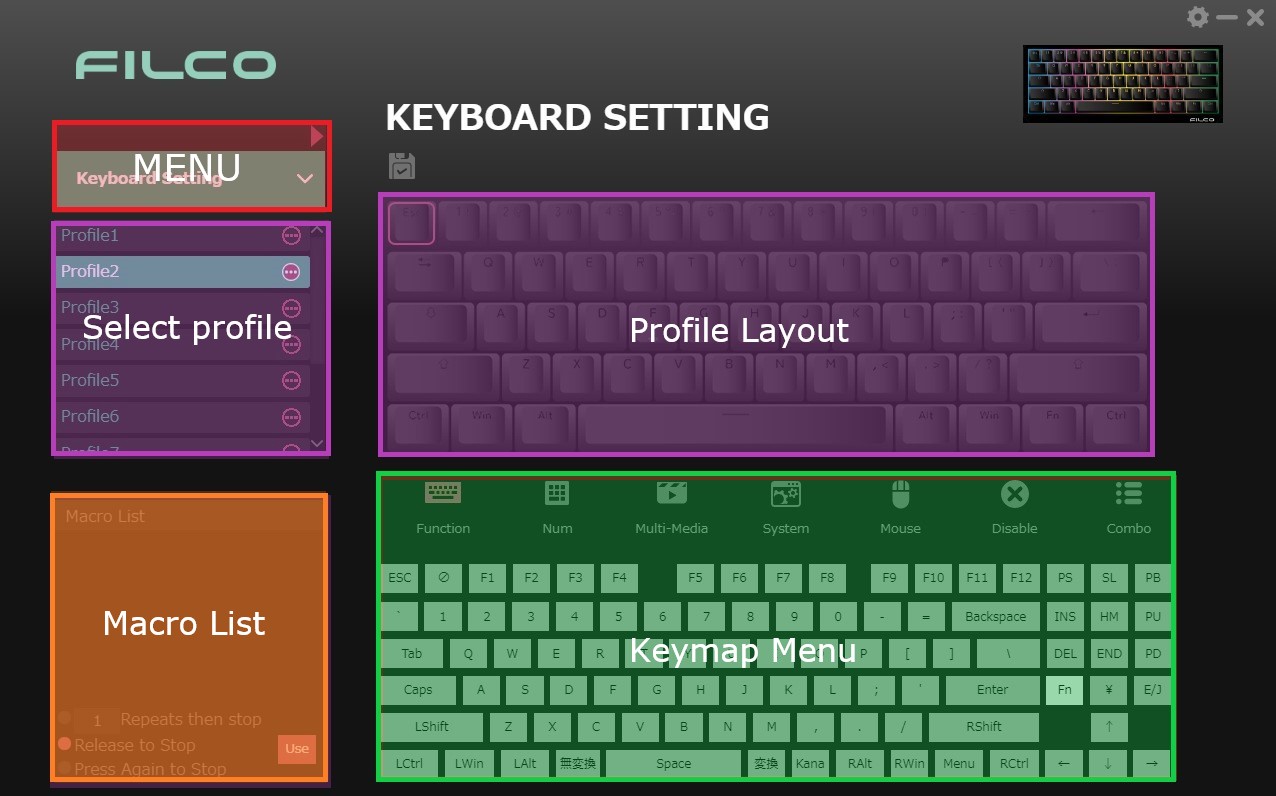
Menu:
You can change key assignments, write, and record macros from the pull-down menu.
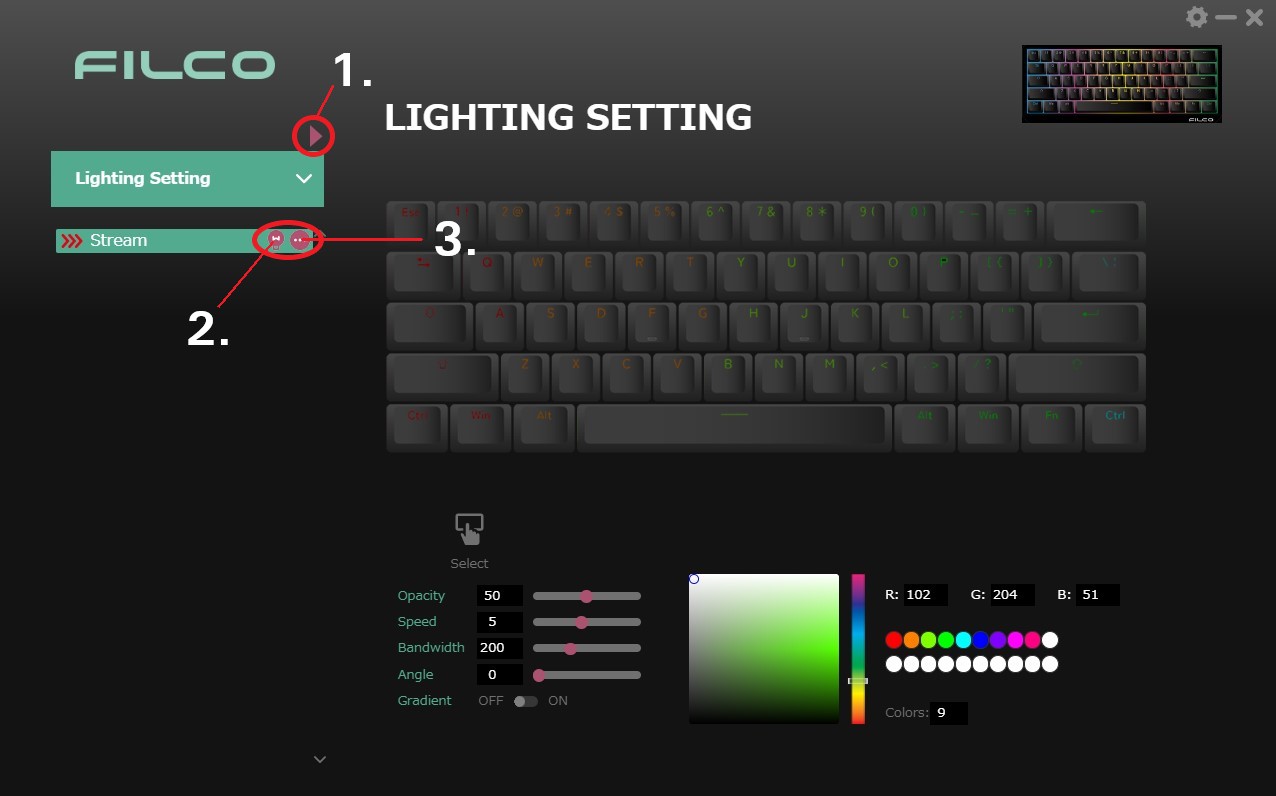
Also export and import profiles by selecting the in the upper right corner of the pull-down menu.
* Details of each menu are described in 2. on beyond.
Select profile:
There are 10 profiles available, and name can be changed by double-click.
You can also change the settings of the win key lock function and cursor key switching from the button to the right of the name.
Cursor key switching: When turned on, I, J, K, and L cursor keys will switch to W, A, S, D.
Profile layout:
Keymap of the selected profile is displayed.
Macro List:
This area displays a list of macros in the currently selected macro list.
You can assign macros to the keymap displayed in the profile layout.
Keymap menu:
This area allows you to select keys and shortcuts to change the keymap.
2. Using [KEYBOARD SETTING]
2-1. About each function
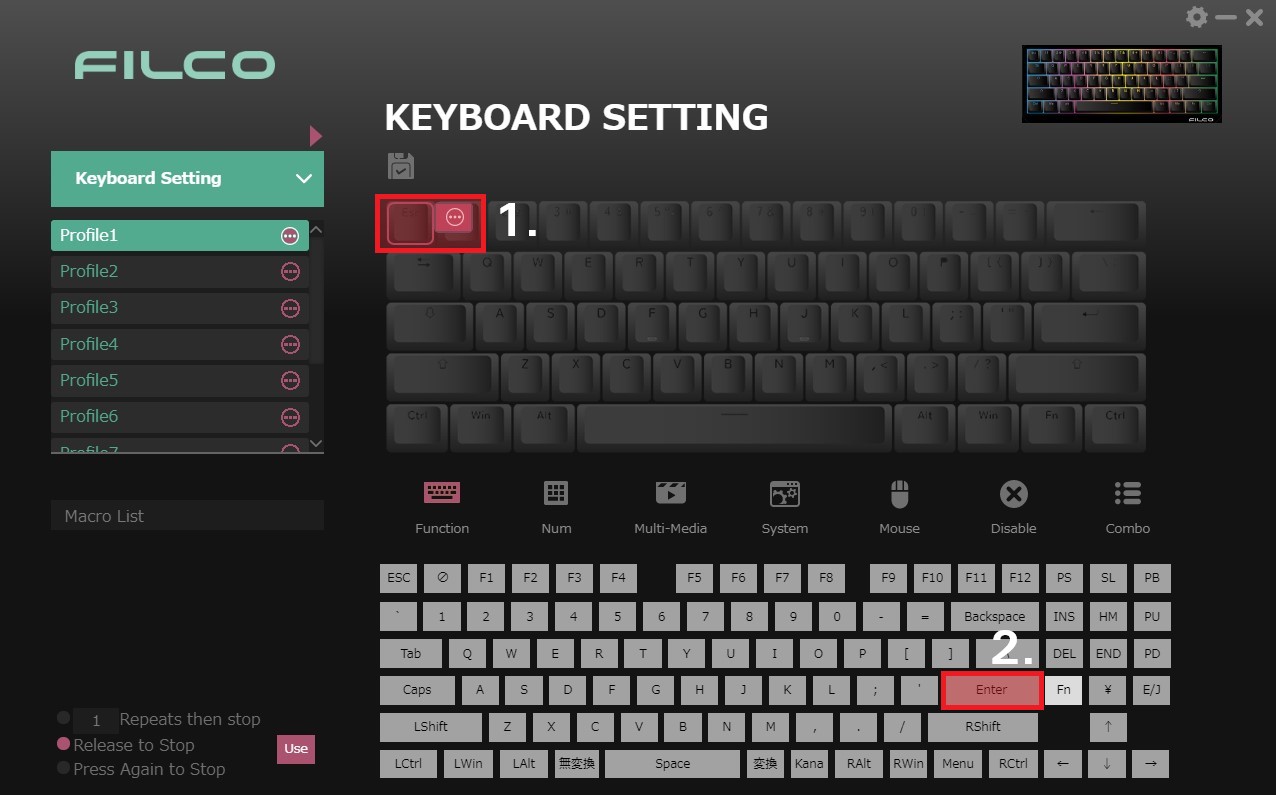
Menu default key setting allows you to change the keymap, and assign function from seven categories to any key.
Setup steps for assigning Enter to ESC are described below.
[Setup Procedure]
1. Select the "ESC" key you want to change the assignment.
2. Select the "Enter" key you want to assign from the key map at the bottom.
3. Check the assignment.
4. Click save icon to complete.

2-2. Basic functions and other menu

Functions:
Normal keys can be assigned. However, you cannot assign keys that do not exist in the layout.
* Ex. Assigning ¥ to the English layout, etc.
Num:
Assign functions such as left and right clicks.
Multi-Media:
Shortcuts for videos, music and PC volume can be assigned.
Media Player and [Play/Pause] only work with videos, [Previous] and [Next] only work with music. Stop works for both videos and music.
[Volume up], [Volume down] and [Mute] are volume adjustments for the PC.
System:
Simple shortcut that can be used in the browser or OS will be assigned.
Favorites is a function that determines whether or not the favorites bar is displayed on the browser. Browser will also follow the default settings.
Email will launch Outlook.
Mouse:
Assign functions such as left and right clicks.
Disable:
Disable or enable keys by type (layout range).
Combo:
Turn on any key from Alt/Shift/Ctrl/Win, and then input the key you want to create a combo with into the combination key to assign the combination function.
* 無変換, 変換, Kana, E/J, Fn cannot be set (Japanese layout only).
* Please hold down the shift key while entering CapsLock.
3. Using [LIGHTING SETTING/BUILT-IN EFFECTS]
3-1. About [Lighting Setting]
Lighting Setting is a lighting setting that can only be used while Luce Assist is running.
There are 11 different lighting patterns available, ranging from gradations to lighting that only occurs when there is input, to patterns that change along with the music.
It also allows for more fine adjustments than Bulit-in Effects, but it is launched from the application, and the lighting is only reflected while the software is running.
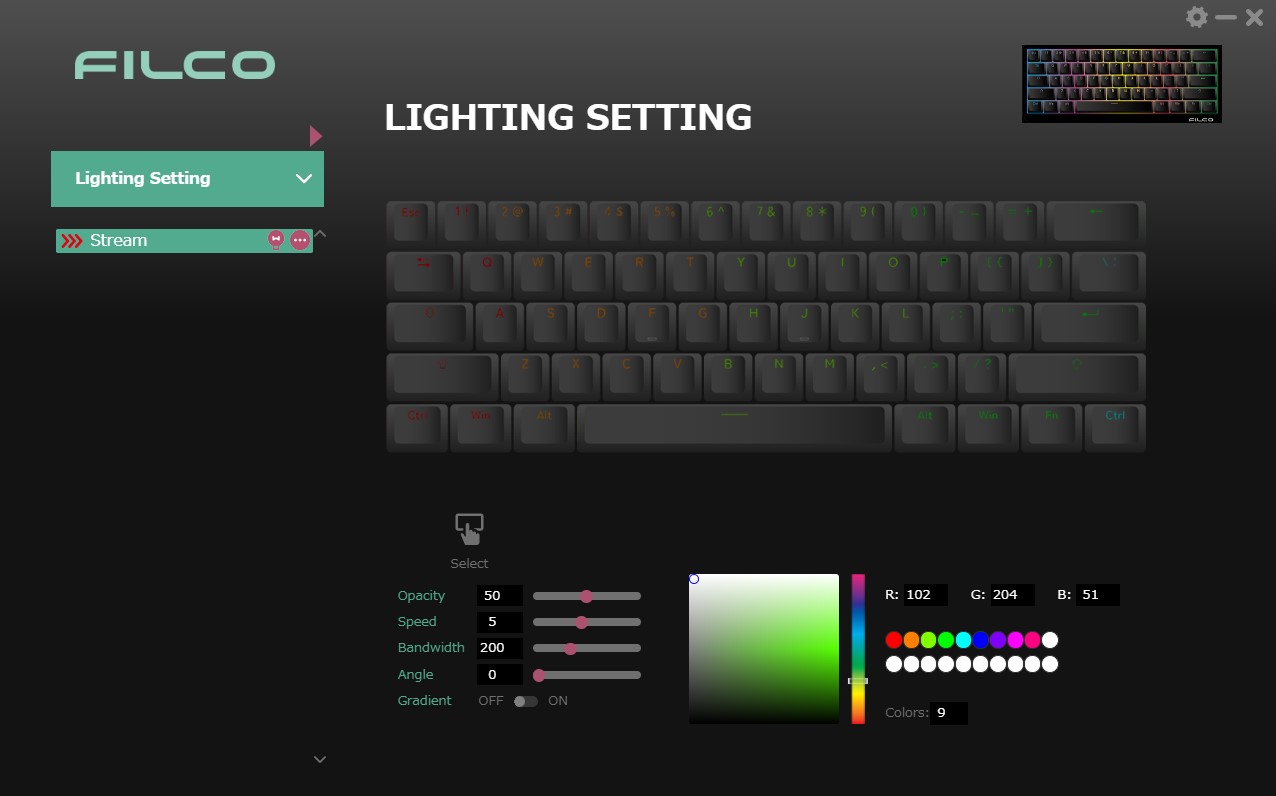
3-2. [Lighting Setting] Functions
【Display contents】
1. Option menu (add or delete set lighting, export and import)
2. Light ON/OFF switch
3. Displays a list of lighting patterns
[About lighting settings]
When you select a lighting pattern, setting menu will appear at the bottom.
*Applicable effects (opacity, angle, etc.) vary depending on the lighting pattern.

Select:
Disables the lighting effect for the selected key.
Effect:
Makes the selected key the center point of the lighting pattern.
Opacity:
Adjusts the intensity of the lighting.
Speed:
Adjusts the speed of the lighting pattern.
Bandwidth:
Adjusts the width of the light pattern band.
Angle:
Adjusts the angle of the light pattern (angle at which the colors flow).
Gradient:
Inserts intermediate colors at the boundary between the colors that emit light (gradation).
Gap:
Interval at which the light pattern is repeated (increasing the value increases the interval).
Bidirectional:
Effect of making the pattern symmetrical.
Colors:
Adds light-emitting colors
* Colors can be added up to 20 colors. If the speed becomes extremely fast, colors and patterns may not be reflected correctly.
Fire:
Size of the fire (Pattern: Fire only)
Amplitude:
Range of light-emitting patterns affected by sound (Pattern: Audio Sync only)
3-3. About [Built-in Effects]
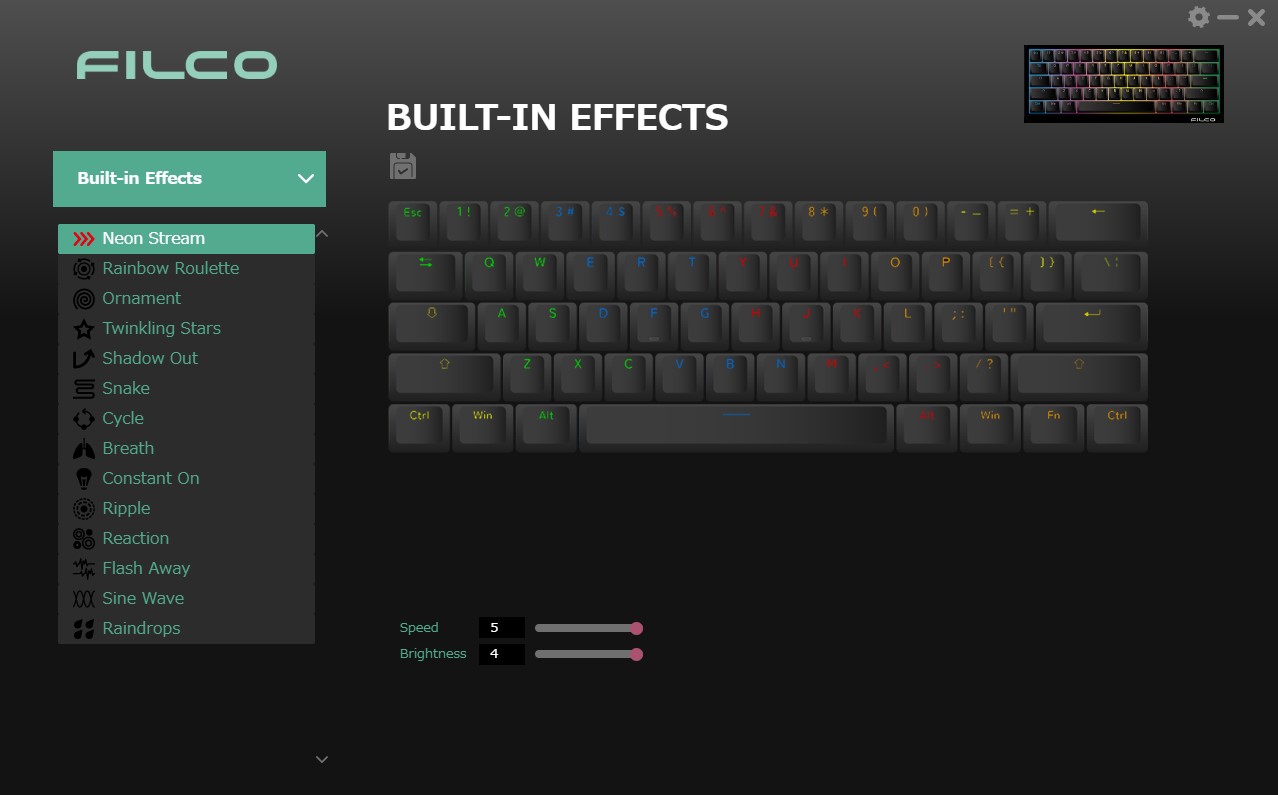
Built-in Effects is a lighting setting built into the keyboard.
There are 14 lighting patterns, allowing you to make simple lighting settings.
Press the save icon displayed above the layout to save the settings to the currently selected profile.
4. Using [CREATE MACRO]
4-1. About Macro List
Macro List is where macros are stored.
You can create up to max 20 macros in Luce Assist, and each list can store 40 record macros.
If you need more than 20 macro, export and import are also supported, so you can manage them outside the software.
[How to create Macro List]
Click [ ] on the macro warehouse and then click Create new to complete the warehouse creation.
([ ]: Create / [ ]: Delete)
* You can edit the macro list name with the pen icon ( ) next to the warehouse name.

4-2.About Macro files
Macro files can be added to the Macro List.
Macro files will be as recorded macros, file names can be changed and input interval can be adjusted.
[How to create macro files]
Click [ ] from the file menu in the bottom left to create a new macro file.
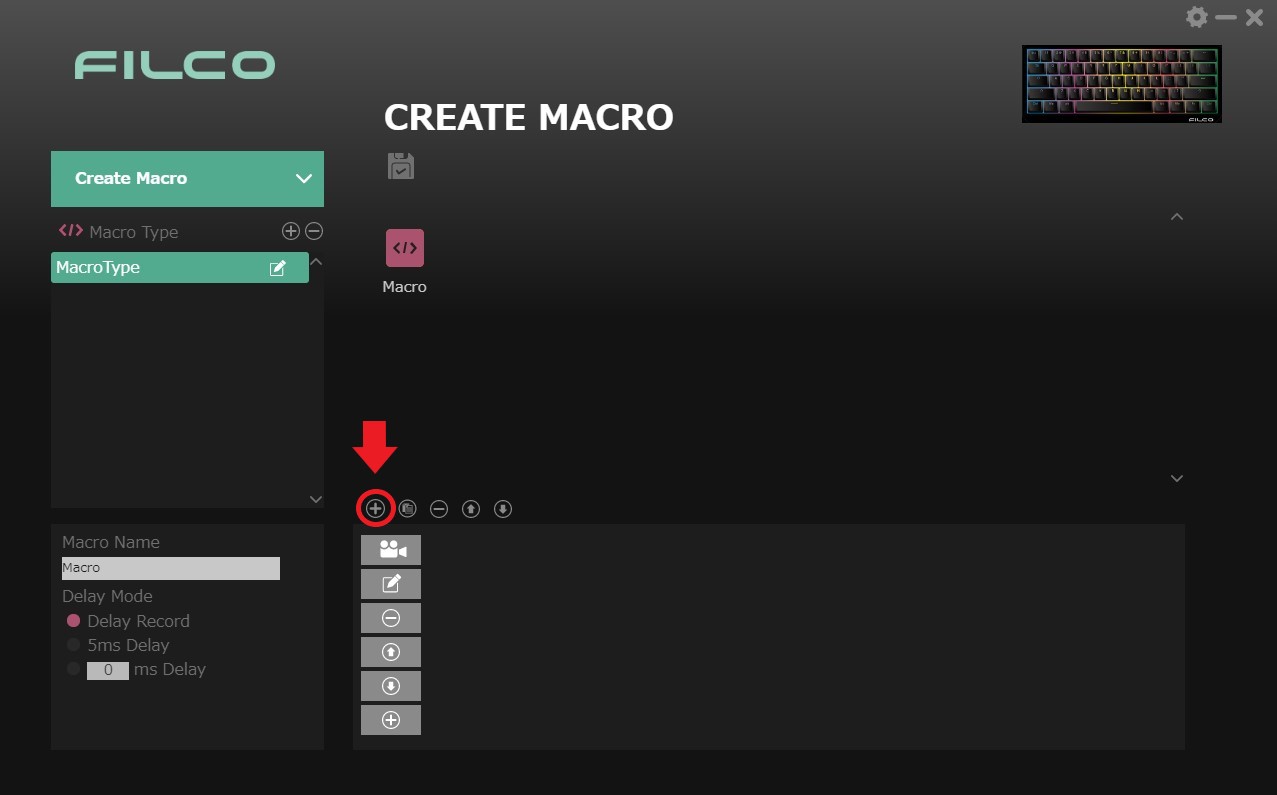
[About file menu]

4-3. About macro file settings
Macro file menu has an edit menu where you can set the name and macro delay, editor menu to record each keystroke, and make fine adjustments such as input intervals.
Macros are recorded as record macros, and a maximum of 40 keystrokes can be recorded including mouse clicks.
[Edit Menu]
Macro Name:
Click the text box to change the name of the macro file.
Delay Record:
Records the macro content based on the keystroke recording speed.
5ms Delay:
Records each stroke at a speed of 5ms.
Nms Delay:
Records the stroke content based on the time specified by the user.
*Delay time can be manually changed later.
[Editor Menu]
Record/Stop:
Press to start recording, press again to stop.
Edit:
Enter editing mode for selected stroke spacing and keys. Press again to exit the mode.
Delete:
Delete the currently selected stroke.
Move Up:
Move the cursor above the selected stroke.
Move Down:
Move the cursor below the selected stroke.
Insert:
Add a key stroke.
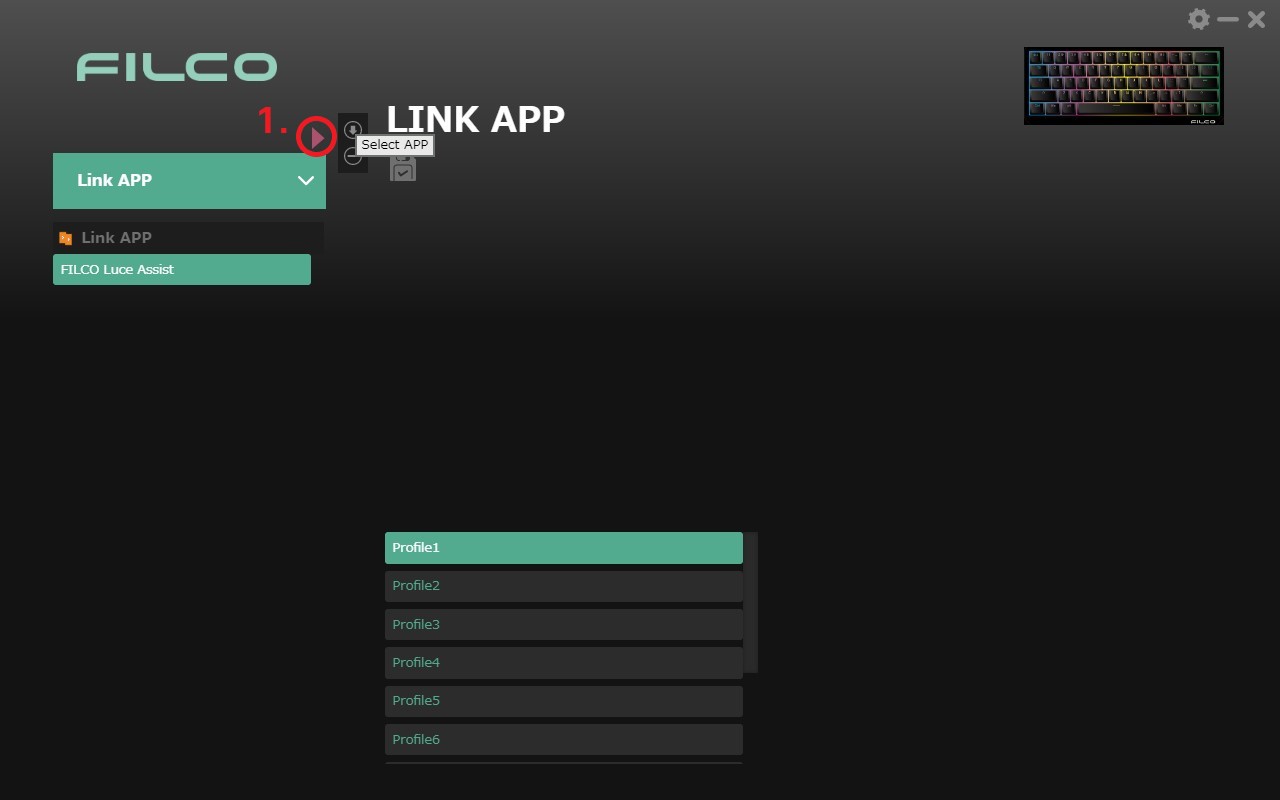
5. Using [LINK APP]
LINK APP is a function that automatically switches to the linked profile when you launch a set application.
The extension that can be linked is ".exe (executable file)", but please actually set up and check whether working with each application.
*It does not support operation in all applications.
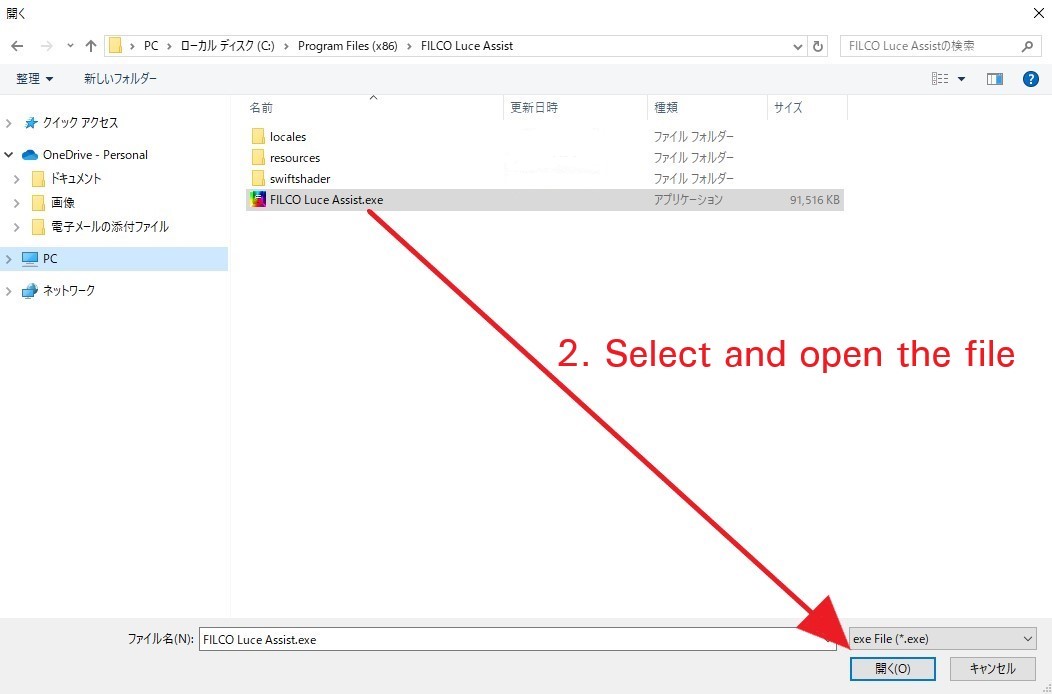
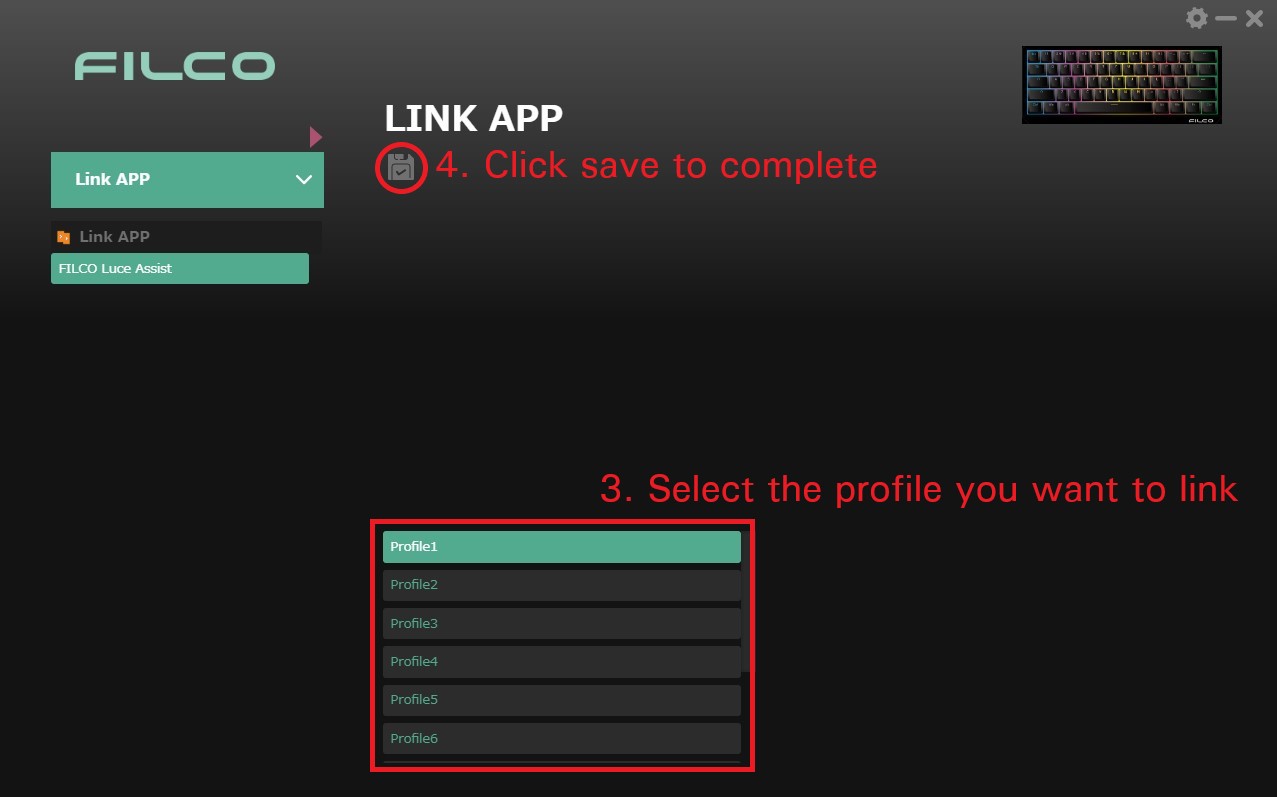
[How to setup Application]
1. Click " " on the right of the menu and select "Select App".
2. Specify the desired .exe file from the menu that opens.
3. Select the profile you want to link.
4. Click Save to complete the settings.